Providing quilt patterns is a new feature of our site. I hope you enjoy them. If you have any quilt patterns you would like to see, please email me.
For a lap-sized quilt, 48" x 54", you will need approximately 3-1/4 yards of fabric for the top, and 3-1/4 yards for the backing. I always buy 1/8 to 1/4 yard more of each fabric to allow for shrinkage when washed. When I made this quilt, I used a medium weight light-to-medium blue denim fabric, and a 100% cotton theme fabric. I alternated the theme fabric and the denim squares. This made the quilt reversible. I matched the fabric to the person I was giving the quilt to. I used construction equipment print for my 5 year-old nephew.
Construction:
1. Wash and iron fabric.
2. Cut fabric into 9" squares . You will need 72 squares of each fabric.
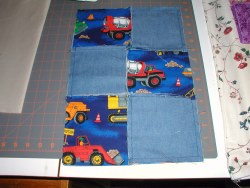
3. Layer fabrics WRONG sides together, one square of theme fabric and one square of denim fabric. It doesn't matter which one is on top.
4. Place two sets of squares together, making sure one theme fabric and one denim fabric are right sides facing. Also be sure that the theme fabric faces the same direction.
5. Sew 1/2" seam allowance on one side. I used a narrow zigzag stitch for extra strength.
6. Open up and press seam toward the denim fabric. The seams stay to the top of the quilt.
7. Sew 20 sets of squares with the theme fabric on the left side, and 16 sets of squares with the denim on the left side. Make sure that the theme fabrics face the same direction. Lay out the square sets so that you have 8 squares in each row and 9 rows.
8. Make 9 rows keeping the seams on the top of the quilt. Be sure to alternate the starting block of each row. You will need 5 rows that start with theme squares and 4 rows starting with denim squares. Again be sure that the theme fabric faces the same direction.
9. Now you will sew the rows together. If you pressed all the seams to the denim fabric, they will be offset when sewing the rows together. Use this to keep the seams straight. Be sure to keep the seams on the same side of the quilt. This may sound like a "Duh!" kind of comment, but I had to rip out a couple of seams because it's easy to mess this up when both sides look like the right side. LOL.
10. When you get all the rows sewed together, sew 1/2" from outside edge all around the quilt.
11. At this point you may think you are done, but there is still one more very important step to do. (Ask me how I know this!) What you will have now at the intersection of the squares is 4 seams forming a small square. You will need to clip on both sides of each seam up to, but not through the seam line.
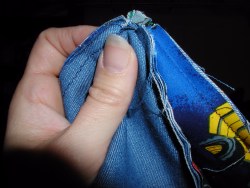
You may feel like skipping this step, but you will be sorry once you wash it. The seams on this quilt will ravel when washed, and if the seams are not clipped, you will have lots of threads separated from the seams. If the seams are clipped, those threads will fall off the quilt and the seams will have a chenille-like effect. It is really difficult to clip these seams after the quilt has been washed.
I hope you enjoy making this quilt. It is really very easy, and very cute when done. I would love to see pictures if you would like to send them on.

Quilt Samples · Quilt Patterns - Raggedy Quilt · Quilt Patterns - Quilted Sweatshirt Jacket · Custom Quilts & Quilted Accessories
